
When it comes to lighting your garden before there is any design, you need a basic understanding of up and down lighting and what type of garden lights you can use.
Why is this important?
Once you’ve got an understanding of up and down lighting principles and you see what lights you can use, then it makes designing and planning your garden lighting 83% easier for you.
And here’s what else…
Over the past six years, I’ve helped hundreds of customers with their lighting plans. I study lighting design and layout, and I install our garden lighting as well. So, I have a solid idea of how to create beautiful lighting in gardens.
Here’s how this page helps you with your garden lighting design and plan.
You’ll discover…
- How to view your garden, what you need to think about and consider from a lighting angle. (get this, and you’ll know where to place lights)
- Up and down lighting and why you don’t just want up-lighting.
- Different types of garden lights and how to best use them to create a stunning night-time garden.
- A truly “no brainer” (yet almost always overlooked) way to plan your garden light layout.
Now let’s take a look…
Where Is Your Garden Viewed From?
When you look at an area to light, think about it. Where do I spend most of my time, and what I will see?
When you sit in your outdoor area, take note of the main viewing angles of your garden. When you’re inside your house, are there windows that give you a great view of your garden?
Why are these main viewing angles important?
Because these are the viewing angles you’ll see most, we want to make sure lights are placed in the right spots.
Viewing Angle Example:
One of our customers had a big window in their kitchen that looked out onto the centre of the garden. We made sure that the plants in a direct line of sight from the kitchen window had lights on them.
The main view of the garden from the outdoor entertaining area was viewed at a different angle from the view from the kitchen window. So, we ensured both viewing angles had lights in the right spots. Now, the garden creates a beautiful view from the kitchen window and outdoor entertaining area at night time.
Down Lighting And Up Lighting
Garden lights can be used to shine light up or down. This may not seem like a big deal, the thing is, this is one of the secrets to creating beautiful garden lighting.
A good lighting design uses both up lights and down lights because up lights and down lights give different lighting effects. If all your garden lighting does the same thing, for example, shine up, it can look one-dimensional, flat, and a little boring.
Down Lights
- Hang lights in trees
- Can hang 1-3 lights in a tree
- It’s like moonlight and shadowing
- Gives balance and a different lighting effect
- Can use downlights to light areas of transition between two areas, path and grass
- Downlights cast more light across a wider area the higher the light is positioned.
- Downlights are great for active areas, kids, dogs, etc.
- Use the eves of a house and light back down onto a garden
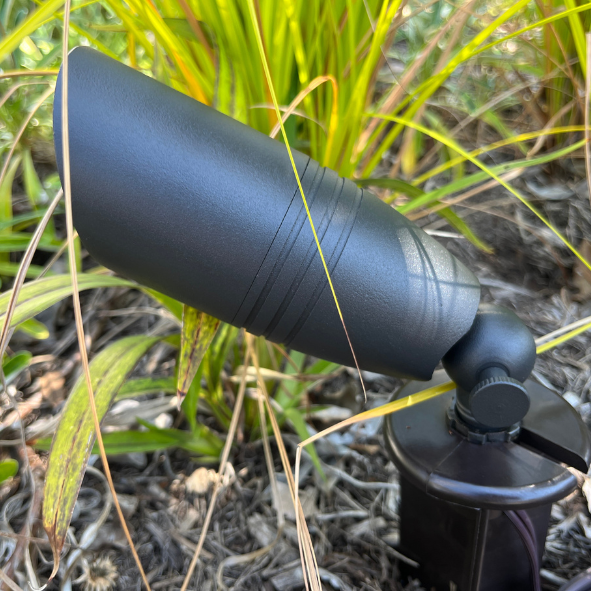
Up Lights
- The light comes from the ground up
- Great for lighting high up into trees
- Great for lighting plants
- When lighting trees, always light the trunk and branches, not the leaves
- With in-ground lights, the light starts much lower compared to a garden spike light, which gives you a different lighting effect
Up lights are usually the main type of lighting used in gardens. With your garden, it might only take one or two down lights, with a mixer of up lights, and you get a beautiful lighting effect.

Okay…
So far we’ve covered what areas you’ll see most when you’re viewing your garden, and up and down lighting.
Now we’ll take a look at what lights you can use to light your garden, then we’ll put it all together and workout a garden light layout for your garden.
Lighting Plants & Rocks
You’ve probably got plants of all different shapes and sizes. A few options for lighting plants are
- Lighting rocks or rock walls, use a light with a wider spread and softer light, like a wall washer because it’s not as bright and won’t create an intense light spot.
- If something has multiple viewpoints, light if from both angles
- When you use garden spike lights to light plants the light starts higher, because the stake can be 200mm high.
- Inground lights start the light from the ground level which is great for lighting shrubs, trees and features.
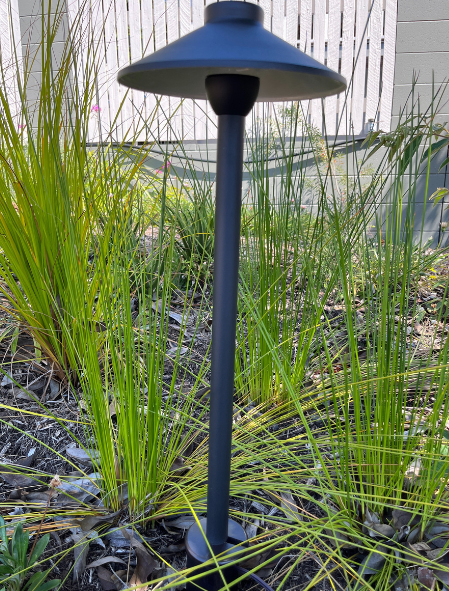
Lights You Can Use Lighting Plants And Rocks
- Garden Spike Lights
- Inground Lights
- Wall Washers
- Path Lights
Lighting Trees
Trees create beautiful night-time features, so a bit of thought needs to go into lighting trees.
- With trees, always light the trunk and branches, not the leaves
- Lighting a big tree, place lights in multiple positions to cover the viewing angles. 2-3 lights for big trees.
- Downlights are great for lighting trees
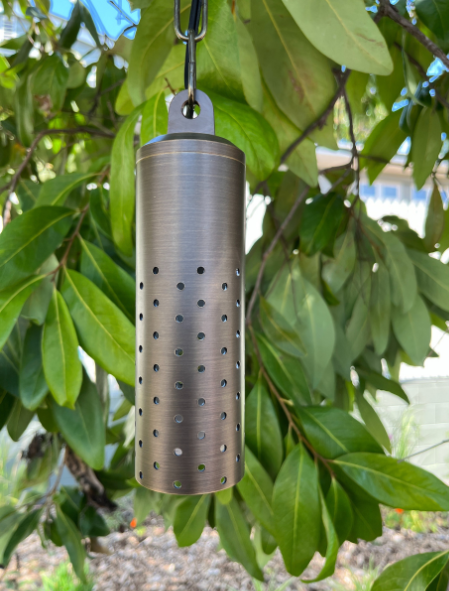
- Pendant lights give a moonlighting effect
- If you’re lighting a few trees, don’t be afraid to mix up how you light them. One tree might have up lights, you might use down lights and hanging lights on another tree, and another tree might have inground lights
- Palm Trees: 2 up lights positioned to cover viewing angles look great (light the trunk.)
Lights You Can Use Lighting Trees:
- Hanging Pendant lights
- Apollo garden lights
- In-ground lights
Lighting Stairs
Here’s a few things to consider when you’re lighting stairs.
- Focus on safety
- Light as subtly as you can
- Light the top of the stair riser
- Avoid shadows on stairs
- On small stairs path lights are great
Lights You Can Use On Stairs
- Path lights
- Hanging lights
- Wall washers give residual light
- Deck lights
- Landscape lights
Lighting Paths
You’re not just restricted to path lights when it comes to lighting paths and walkways. You can use 3 types of light-to-light paths: Up lights – down lights – standard path lights.
- Lighting a path can alternate the lights on either side – for a more modern look space the lights opposite each other evenly spaced out
- If there are big rocks or walls beside a path, you can shine a wall washer onto the rocks or wall and you’ll get some indirect light back on the path
- If there are trees over the path, use pendant lights to light the path
- Driveways – install a number of small posts, example post height, 60cm high and use a directional garden light (Apollo) wide beam to light the driveway
- High traffic busy areas where lights could get knocked, use inground directional light to shine across the path
Lights You Can Use Lighting Paths
- Path lights
- Pendant lights
- Apollo garden lights
- Wall washers
- In-Ground Lights
Lighting Perimeters
Lighting the perimeter of your place adds depth, and it expands the living space. It makes the property feel larger, and gives a sense of space, comfort, and security
Here are some tips lighting the perimeter:
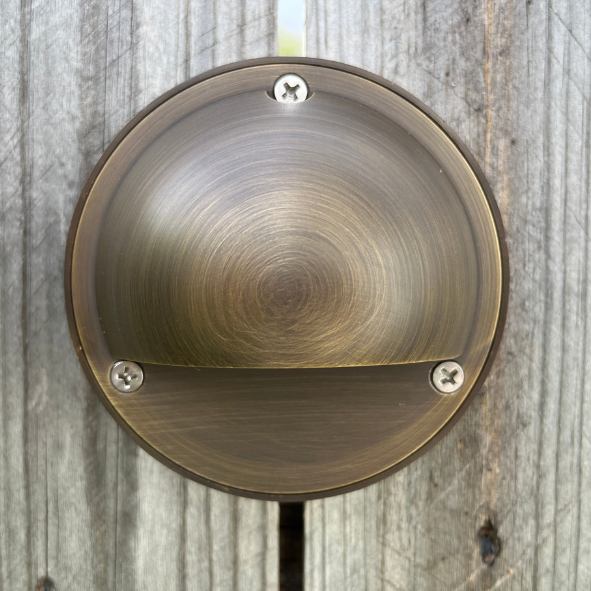
- Small plants at the front use ground lights when there are layers of plants because this starts the light lower.
- Wall washers have wider light spread and lower intensity
- The brass finish is great because it disappears into the background
- Use different intensity lights
Lights You Can Use Lighting Perimeters
- Path lights
- Pendant lights
- Apollo garden lights
- Wall washers
- In-Ground Lights
Light Colour And Why It’s Important
The colour of the light that shines onto your garden and trees affects how it all looks.
Our garden lights and warm white 2700K. We found warm white 3000k was a little sterile.
Other options for light colour are RGB lights (red, green, blue) you can choose a colour. If you get coloured lights, you’ve got to make sure one of the settings allows you can turn them back to warm white 2700k.
Planning Your Garden Light Layout
Okay…
We’ve run through up lights and down lights—lighting plants, rocks, walls, trees, stairs, paths, and perimeters. You’ve got a basic understanding of lighting your garden area.
Now, we want to come up with a design and layout.
Here’s what you could do…
Step 1: Grab some clothes pegs and walk out to your garden area. (You’ve already thought about viewing angles and what parts of your garden you’ll see the most of.)
Step 2: Now, place some pegs as markers in the best positions you’ve worked out.
Step 3: Now, on paper, roughly draw your garden layout and mark where your lights will go.
Step 5: Then get a tape measure to measure the distance from the power to the first light, then the first light to the second light, the second light to the third light, etc. If you have a few different sections to your garden, for example, front yard and backyard. Each section can run off its own transformer.
Step 6: Send your plan and pictures of your garden to info@fusionlighting.com.au and
I can take a look at it for you.
I’ll give you suggestions ideas, and make any recommendations and show you what lights could be used to light different plants and areas. To make lighting your garden easy, I’ll give you a detailed list of all the lights and equipment you need to light your garden.
Step 7: Order your garden lighting
How Many Garden Lights Do I Need In My Garden?
You don’t need to light every plant and every tree. Garden lighting is not about trying to create daylight.
How many lights you need comes down to a few things:
- The size of the area you’re lighting
- What you’re lighting
- What type of lights you’re using
- How you’re lighting the area? (are downlights being used and uplights because this makes a difference.)
Fact is…
There’s no set number of lights to be used in certain size areas.
Garden lights aren’t just something you throw up. There is an art and design to it. Part of its art and design is working out the viewing angles I mentioned earlier. Another part of the art and design is the lights you use and how they are used.
A big mistake many make is overlighting their garden.
If you’re unsure how many garden lights you need, you can send through some pictures and a rough plan of the area you want to light, and I’ll take a look and work it all out for you.
Another way to do it is to get a few of the lights you like to start with and then test them out of a night-time over a couple of nights. You can move the lights around and play with them. Then you can order more lights.
If you’d love to get some help and advice on lighting your garden, you can get a garden lighting design specialist to help you.
Here’s What To Do:
Send pictures and (videos if you want) of your outdoor area and garden. Send a rough drawing showing the area and a few measurements.
Once I get all this information, I’ll carefully review it and work out a garden lighting design and layout for you.
I’ll show you what lights to use and where to use them to create a beautiful lighting effect.
I’ll outline everything you need to light your garden and how to do it.
If you live in Brisbane, Gold Coast or the Sunshine Coast area, we also have an installation service.
A beautifully lit garden and outdoor area create a beautiful backdrop and increase the enjoyment you get from your outdoor area.